Sunday 29 June 2008

Shopping di Clark Village, Somerset


Dah petang baru kami sampai kat Clark Village...itupun aku ingatkan macam dah tak jadi pegi jer...mana tak nyer...jam 11 pagi..cik abang masih dibuai mimpi lagi. Clark Village ni.. terletak di Somerset iaitu dekat 3 jam perjalanan dari rumahku. Kat sini banyak terdapat factory outlet. Disini juga terdapat kilang kasut Clark.. Time aku pegi ari ni..seme outlet ada sale...


Aku sempat mencuba beberapa handbang...orang sebelah offer nak tolong belikan tapi satu pun design yang aku berkenan...selamattt!!!????


Muka anak-anakku yang kelaparan...ibu depa asyik shopping jer...sampai tak sempat nak cari makanan...sabo yer anak2...

Saturday 28 June 2008

Wilton Cake Decoration Class Lesson 3


Ari ni aku belajar camner nak buat bunga ros, drop flower guna buttercream icing..pastu Lisa ajar mendeco clown atas muffin..ini hasil deco pada hari ni...

Friday 27 June 2008

Tau Sa Piah

Filling:

1 1/2 cup skinned mung beans -soaked for 2-3 hrs, steamed and blended( 2nd attempt, i used green mung bean & boiled, drain, left to dry overnight & blended)
6 tbsp cooking oil
2 bulb shallot-chopped
1 cup sugar
1 tsp salt
1 tsp grated orange grind

1. Add sugar, salt the mashed beans.
2. Heat oil, fry the shoots till lightly brown and fragrant
3. Pour in the bean mixture. Fry till mixture become dry and able to form into a ball. Divide filling to 25g ball size.


Dough A:
230g flour
110g oil

Dough B:
460g flour
220g oil
180g water
1 tsp vinegar

1. Mix A, (rest dough for 30 mins, sealed) divide into 10g ball
2. Mix B, (rest dough for 30 mins, sealed) divide into 25g ball


Step by Step Method:


1. Brush with egg, top with sesame seeds.
2. Bake for 180 degree celcius for 20 mins till golden brown

ORANGE CHIFFON CAKE


Ingredients :

115g cake flour
3/4 teaspoon baking powder

85ml warm orange juice or used sunquick mixed with warm water
Finely grated zest of 1.5 large orange (I omit this one)

5 egg yolks + 30g castor sugar + 1/4 tsp salt
5 egg whites + 50g castor sugar + 1/2 teaspoon cream of tartar
60ml corn oil
1/2 teaspoon vanilla essence

Method :

1. Sieve flour and baking powder.
2. Use hand whisk to whisk egg yolk, 30g castor sugar and 1/4 teaspoon salt until creamy and light in colour. Add in corn oil then warm orange juice.
3. Add in flour mixture into yolk mixture lightly. Add in orange zest.
4. Beat egg white with electric beater until big bubbles formed. Sprinkle in cream of tartar and beat until it is white in colour. Add in 50g sugar 3 times (a little at a time) and beat until stiff perks formed. About 8 - 10 minutes for 150w egg beater.
5. Pour 1/2 egg white into flour mixture in (3) and blend well.
6. Pour flour mixture into the rest of the egg white and blend well. Pour into an ungreased chiffon cake tin.
7. Bake at 175C for 45 minutes or until cooked.
8. Invert the cooked cake during cooling process.

How to Drizzle Chocolate on Sides of Cake

How to make Pandan Chiffon

How to make Chocolate Ganache


Thursday 26 June 2008

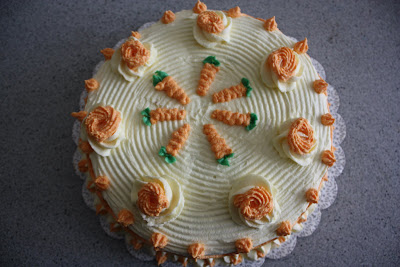
Hasil Deco yang ke-2 : Carrot Cake


Pagi tadi selepas anto anak-anak ke sekolah aku mencuba resepi Carrot Cake...sambil ditemani Ros...sambil memukul telor aku asyik bersembang hingga terlupa nak memasukkan walnut ke dalam adunan...aduh!..kek dah masak baru perasan satu ingredient miss....walnut oh walnut...kenapa ko tertinggal..!!..


Jam 12.00 tengahari aku mula mendeco kek ni...aku guna cream cheese frosting untuk mendeco kek ari ni...corak dan hiasan? bantai aje ler...inilah hasil deco orang baru belajar...layannn....

Tuesday 24 June 2008

The Famous Barber in Town


Ini part time barber kat UK...khas untuk 4 orang customer jer...

Monday 23 June 2008

Shopping di Wing Yip London


Pagi ni...aku ngan ros pegi pegi shopping kat Wing Yip London...bukan senang nak datang sini...jom kita tengok apa yang ada dijual kat sini...


Kat sini ada jual durian...hmm beso-beso pulak tu...harga??? jangan tanya ler...berganda reganya compare to durian kat mesia...kalu mengidam baru boleh beli...


Cuba tengok kepala ikan salmon ni...fresh kan? kalu masak kari kepala ikan ni...sure sedap...hmmm meleleh air liur terkenang kari kepala ikan kat kedai mamak kat mesia tu..nak tahu kenapa?? kari tu sedap sebab diperam 2-3 hari...


Kalu pegi ke sini...aku mesti beli sawi, taugeh, tahu, pak choi, serai dan Kuewteow kering...aku kena beli lebih sikit..buat stok..sebab barang-barang ni..tak de dijual di Tesco.


Sebelum balik..sempat lagi bergambar kat singa ni...layannnn....

Malam Pertama, Bersediakan Anda??

Kita pasti dirisik..
Pertunangan sejak azali..
Di hujung hidup nanti..Berlangsungnya perkahwinanmu dengan maut..
Hantarannya..sakit dan nazak..
Tamu bertandang menghadiahkan esak tangis..

Pengantin dimandikan..
Dipakaikan baju cantik putih..
Wangian gaharu dan cendana..
Keranda jadi pelaminan..
Pengantin bersanding sendirian..


Di arak keliling kampung..
Berkompangkan azan dan kalimah kudus..
Akad nikahnya bacaan talkin..
Berwalikan liang lahat..

Saksi pula nisan-nisan..
Siraman air mawar..
Keluarga terdekat menepung tawar..
Tiba masa pengantin..
Menunggu sendirian..

Malam pertama bersama KEKASIH..
Di kamar bertilamkan tanah..
Dan Dia menuntut janji..
Sucikah kita tatkala berpadu..

Pernahkah taubat sepanjang hayat..
Atau terkubur bersama dosa-dosa…
Dan Dia Kekasih itu..
Menetapkanmu ke syurga..
Atau melemparkan dirimu ke neraka..

Bagaimana? Terasa hendak menjadi ‘pengantin’ tersebut? Marilah bersama muhasabah diri. Kita hanya insan, mudah terleka dek godaan syaitan…

Sunday 22 June 2008

Dslr Tips

Canon EOS 450D Digital Rebel XSi review


How to snap Night Photography


How to blur water for a dreamy effect


How to blur action shots for a feeling of speed


How to blur backgrounds on portraits


How to take perfect sunsets


How to darken your exposures

How to get a smooth the cake


How to make a Buttercream roses


Saturday 21 June 2008

3 Sahabat cum 3 mak dara!


Hmmm...inilah 3 mak dara yang selalu diciterkan dalam blog aku nih...hmmm..kalu pegi shopping...pegi car boot...pegi jenjalan...inilah gengnya....yang tengah tu...ros...dan yang tepi tu ana...gambar ni diambik semasa sesi minum pagi di Restoren Al-Fannouse pada 19 Jun ari tu...

Wilton Cake Decoration Class Lesson 2


Kelas mendeco ari ni...LISA mengajarku membuat Rainbow Cake...aku telah meng'coating' kek dengan warna biru muda semalam...cuma tinggal untuk menghias dengan rainbow dan sedikit writing diatasnya...taraa...!!! ini dia hasil sulongku dalam bidang menghias kek...agak-agak boleh dapat berapa bintang...untuk hasil pertama ini???!!!!

Friday 20 June 2008

Virginia Water Park dan My homework


Lepas solat subuh...aku menjenguk ke luar tingkap...nampak matahari terbit..terus ambil kamera..shoot gambar ni...Ya..ALLAH!..cantiknya keindahan bumi ciptaan MU ini..


Jam 10.00 pagi..aku dan cik abang pergi jogging kat Virginia Water Park dekat Windsor..sambil dia bersenam tu...aku pun mencuba kamera dslr...kali ni..aku cuba menangkap gambar black & white...cantik tak???


Petang aku menyiapkan homework yang diberi oleh LISA...mengicing kek warna biru muda untuk persediaan projek rainbow cake kelas hari sabtu ni...ari tu masa LISA buat demo..aku tengok macam senang jer...hari ni..bila buat sendiri..terasa susahnya..sampai sakit-sakit jari-jemariku ini...rupanya mendeco kek ni memerlukan tahap kesabaran yang tinggi...at last aku berjaya menyiapkan homework yang diberi...hmmm inilah hasilnya kerja aku petang ni....esok kita tengok rainbow cake yang siap sepenuhnya tu yer...tunggu!!!!!

Wednesday 18 June 2008

It's my Birthday!


Hari ni..genap umur aku ..tahun...hmmm...dah tua rasanya diri ni...moga aku dimurahkan rezeki dan dirahmati Allah serta berjaya dalam apa jua bidang yang diceburi.


Lepas anto anak-anak ke sekolah..3 mak dara & Mas ada sesi minum pagi kat Al Fannouse..restoren Lebanese..hmm..the best Shawarma Chicken in Slough..

Monday 16 June 2008

My son - toqi


Nak tahu kenapa gigi toqi tak de? Ini seme gara-gara kena cabut dek doktor gigi kat UK ..tahun lepas...sampai 11 batang tu...sekali cabut jer..kesian toqi...sehingga hari ni..toqi asyik dok komplen kat aku sebab izinkan dokter tu cabut gigi dia..untuk rekod setakat hari ni..gigi dia baru tumbuh 4 batang gigi geraham atas dan bawah manakala 2 batang gigi depan kat bawah tu ...baru mula nak tumbuh...tak pe toqi..lepas ni..gigi toqi paling cantik di UK dan Malaysia juga....

Sunday 15 June 2008

Basic Decorating Techniques - Rope

Finish your piped baskets with pretty edging and handles. Excellent for western or nautical themed cakes. You can make a great-looking rope with star or round tips (or basketweave tips, ridged or smooth side up).
Getting Ready

Set up your practice board. Insert a coupler base in your Featherweight bag and lock open star tip 21 onto it with your coupler ring. Fill bag half full with medium consistency Buttercream Icing.


Practice with: Tip 21
Icing: medium consistency
Positions:
Bag: 45° at 4:30 (7:30 for left handed decorating)
Tip: lightly above the surface

1. Using a steady, even pressure, move the tip in a gentle sideways "S" curve. Stop pressure and pull tip away.
2. Insert tip under the bottom curve of the "S" shape.
3. Squeeze the bag with steady pressure as you pull down, then lift the tip. Move up and over the tail of the "S" as you continue to squeeze and form a hook.
4. Keep spacing as even as possible and "S" curves uniform in thickness, length and overall size. Be sure to tuck the tip into the bottom curve of the previous "S" before you begin squeezing to insure the clean, continuous look of a rope.

Basic Decorating Techniques - Sheep


Use tips 1, 2, 8, 14, 81. With tip 8, hold bag at a 90° angle to cake board. Start at rear, squeezing at a medium pressure, move hand forward to form body. With a heavy pressure, allow head to build up. When desired sized is reached, stop pressure and pull bag away. Hold bag at a 90° angle to body and with medium pressure, pipe a dot for head. Tuck tip into hard and build up face, gradually easing pressure to taper snout. Add "petal" ears, tip 2 facial features. Cover head and body with tip 14 shell-motion wool.

Basic Decorating Techniques - Zigzag Puff

This is the fluffy look you want for making clouds or smoke and to add dimension as a side border.
Getting Ready

Set up your practice board.

Insert a coupler base in your Featherweight bag and lock open star tip 17 onto it with your coupler ring.

Fill bag half full with medium consistency Buttercream Icing.


Practice with: Tip 17
Icing: medium consistency
Positions:
Bag: 45° at 3:00 (9:00 for left handed decorating)
Tip: lightly above the surface

1. Begin to pipe with a light pressure, then use heavier pressure toward the center of the puff, then return gradually to a light pressure to form the tapered end.
2. To end each puff, stop pressure and pull tip away.
3. Repeat as you move in a straight line to form a row of puffs.

Basic Decorating Techniques - Zig Zag

Popular way to fill in outlined areas, perfect for ribbed sweater and cuff effects. You can also use tight zigzags to cover the entire side of your cake – they look great!


Tip: 16
Icing Consistency: Medium
Bag Position: 45° at 3:00 (9:00)
Hold Tip: Lightly Touching Surface

1. Steadily squeeze and move your hand in a tight up and down motion.
2. Continue piping up and down with steady pressure. To end, stop pressure and pull tip away. For more elongated zigzags, move your hand to the desired height while maintaining a steady pressure. For a more relaxed look, just increase the width as you move the bag along.
3. Repeat as you move in a straight line with consistent up/down motion.

Basic Decorating Techniques - Ruffle

* Icing: medium consistency
* Tip: 104
* Position - Bag: 45° at 3:00 (9:00)
* Hold Tip: Wide end lightly touching surface with narrow end facing down and away from surface


1. Keep the wide end of your tip touching the cake with the narrow end down. Move wrist up to pull up icing.
2. Move wrist down to complete one curl of the ruffle.
3. Repeat up and down motion.
4. Raise and lower the narrow end as you move around the cake. Repeat this motion for the entire ruffle.

Basic Decorating Techniques - Rosette

This is the fluffy look you want for making clouds or smoke and to add dimension as a side border.
Getting Ready

Set up your practice board.

Insert a coupler base in your Featherweight bag and lock open star tip 16 onto it with your coupler ring.


Fill bag half full with medium consistency Buttercream Icing.

Practice with: Tip 16
Icing: medium consistency
Positions:
Bag: 90°
Tip: lightly above the surface

1. Keeping the tip slightly above the surface, squeeze out icing to form a star and, without releasing pressure, move the tip in a tight, complete rotation, starting at 9:00 (3:00), moving to 12:00...
2. then to 3:00 (9:00) and 6:00...
3. and ending back at 9:00 (3:00).
4. Stop pressure and lift tip away.

Basic Decorating Techniques - Reverse Shell

Opposite-facing shells look spectacular as top and bottom borders and as framed areas on your cake—they add a wonderful motion effect. The look is even fancier finished with a dot or a star at the center of each shell curve.
Getting Ready

Set up your practice board.

Insert a coupler base in your Featherweight bag and lock open star tip 21 onto it with your coupler ring.


Fill bag half full with medium consistency Buttercream Icing.

Practice with: Tip 21
Icing: medium consistency
Positions:
Bag: 45° at 6:00
Tip: slightly above the surface

1. As you begin to form a shell, squeeze hard, letting the icing fan out.
2. Form a curve, moving the tip from 9:00 (3:00 for left hand decorating) to 12:00 to 6:00. Relax pressure and lower the tip, pulling straight toward you at 6:00 to form a tail.
3. Repeat with another shell, curving from 3:00 (9:00 for left hand decorating) to 12:00 to 6:00.
4. To make a reverse shell border, pipe a chain of swirling reverse shells, with the fan end of each new shell covering the tail of the previous shell. If you are making the border on a round cake, turn the cake as you go so that the back of the bag is at 6:00 and you are working toward yourself.

Basic Decorating Techniques - Drop Flowers

Quick, one squeeze blossoms can lavish a cake in a matter of minutes. What's more, you can do these flowers in advance, let them air dry, and save them until you need them.

Getting Ready:

* Set up your practice board.
* Place drop flower tip 2D in a parchment bag or your Featherweight bag. If you wish to use this large tip with a coupler, you'll have to cut an opening on a 12 inch Featherweight bag for the large coupler tip. If you do, however, you can only use this bag with the large coupler and large tips.
* Fill bag half full with medium consistency buttercream icing.
* Make a parchment bag and insert round tip 3. Color a small amount of thin consistency icing in a contrasting color; fill parchment bag.

Star Flower

Tips:2D, 3

Icing: medium consistency for the flower and thin consistency for the center


Position:

* Bags: 90° angle, straight up
* Tips: -for flower: lightly touching surface
* For center: slightly above flower

Sequence:

1. Squeeze out tip 2D star.
2. Stop squeezing, lift tip away.
3. Add tip 3 dot to center.

Hold the bag straight up with the end of drop flower tip 2D just touching surface. Squeeze, letting the icing build up to make the flower. Stop squeezing, then lift tip away. Decorate the flower center:

Hold the bag straight up with the tip almost touching the flower. Squeeze out a dot of icing, keeping your tip buried in it. Stop squeezing, then pull your tip away. Your dot should have a rounded top.
Swirl Flower

Tips: 2D, 3 Icing: medium consistency for the flower and thin consistency for the center

Position:

* Bags: 90° angle, straight up
* Tips: for flower: lightly touching surface -for center: slightly above flower
* Hand: for flower: full twist counter clockwise (clockwise)
* Flat knuckle at 9:00 (3:00); ends at 12:00

Sequence:

1. Lightly touch surface.
2. Turn wrist a full twist.
3. Squeeze out flower as you return your wrist to natural position.
4. Stop squeezing, lift tip away.
5. Add tip 3 dot to center.

The swirl flower is done in the exactly same fashion as the star flower except the wrist is twisted as you make it, giving the petals a natural looking curve.

Hold the bag straight up with the end of drop flower tip 2D just touching the surface. Turn hand holding bag keeping flat of knuckle at 9:00 (3:00). As you squeeze out the icing, slowly return your hand to 12:00. Stop squeezing and lift tip away. Make a dot in the center of the flower with round tip 3.

You can make a variety of flower centers using round tip 3.

Basic Decorating Techniques - Floral Wonder

Transferring Pattern to Your Cake

Use this pattern to decorate the fondant-covered cake. If using buttercream-iced cake instead, let icing set slightly.


Trace pattern onto parchment paper with a pencil or non-toxic marker, repeating as necessary. Position paper pattern gently on side of cake, secure lightly with sharp toothpicks. Outline pattern using sharp toothpicks along pattern lines to transfer a dotted outline of pattern onto cake. Remove toothpicks and paper pattern. Using round tip #3 and buttercream icing, connect dots by outlining.

Embellish designs further by adding dots. Add bead borders to tiers using a larger round tip (6, 7, or 8).

Basic Decorating Techniques - Daisy

Practice with Tips: 104, 5
Icing Consistency: Medium Royal Icing
Bag Position: For Petals, 45° at 3:00 (9:00); For center, 90°. Hold Tip: For petals, wide end lightly touching 1/4 inch away from center of nail, narrow end pointing out to outer edge; for center, hold slightly above flower.

1. Dot center of flower nail with icing as guide for flower center. Starting at any point near outer edge of nail, squeeze and move tip towards center icing dot. Stop pressure, pull tip away.


2. Repeat for a total of 12 or more petals.

3. Add tip 5 flower center and press to flatten. For pollen effect, dampen your finger, dip in crushed Cake Sparkles™, then press on center.

Try these combinations on your daisies—yellow petals with yellow or blue centers, violet or blue petals with yellow centers, peach petals with orange centers. Highlight the center with Cake Sparkles™ or colored sugars which are extra fine texture.

Basic Decorating Techniques - Clowns

Tips: 21, 67

Bags: Featherweight or Disposable decorating bag with tip 21,
parchment paper with tip 67


Positions:

Bag: 90° angle

Tip: slightly above surface when piping body; inserted into body when piping arms and legs

Icing: medium consistency

Sequence:

1. Squeeze out icing with steady even pressure to cover an area about the size of a 50 cent piece.

2. Begin raising the tip, allowing icing to build up, but keeping the end of the tip buried in the icing.

3. Stop at desired height, pull tip away.

4. Insert tip at base of body for leg, squeeze to draw leg out. Relax pressure, pull to a point for foot. Repeat for other leg and foot.

5. Insert tip into body at shoulder, squeeze as you draw arm out.

6. Relax pressure, pull to a point for hand. Repeat for other arm and hand.


Make the body: Use tip 21 in upright position and the basic icing build-up technique to pipe body. Squeeze hard to builld up a generous base, then slowly fill out the body by drawing the tip straight up until you reach the desired height.


Pipe the legs: Insert tip into the front base of the body and draw the icing straight out. Add the feet, drawing to a point as for the hands. You may vary the position of the legs. Draw the legs straight up at the knee and back down again to the foot, or cross the legs back down again to the foot, or cross the legs (bend the crossing leg at the knee for the natural look.)

Pipe the arms: Insert the tip into the body at the shoulder, then squeeze as you draw the tip straight down and then across the body. To form the hands, squeeze a little harder, then relax pressure, drawing them to a point. Stop squeezing entirely before you pull tip away.


Add details: Using leaf tip 67, pipe ruffles for arm and leg cuffs using a zigzag motion. Add the head: Insert a small derby clown head into the top of the body.

TRY THIS: Make color-striped clowns for your cake or cake circle by brush striping a parchment bag fitted with tip 21 in the colors of your choice.

Basic Decorating Techniques - Carrots


Use tip 3. Hold bag at a 90ยบ angle; with heavy pressure, begin squeezing at top of carrot. Lift tip slightly so icing fans out. With steady even pressure, pull bag along. When carrot is desired length, relax pressure and bring end to a point. Shape with fingers dipped in cornstarch. Trim with tip 233 pull-out string tops.

Basic Decorating Techniques - Basketweave

Here is a clever technique that lets you turn the side of a cake into a rustic-looking basket. You simply combine long vertical stripes of icing with short horizontal bars to produce edible basketweaving.
Getting Ready

Set up your practice board. Insert a coupler base in your Featherweight bag and lock basketweave tip 47 onto it with your coupler ring.

Fill your bag half full with medium consistency Buttercream Icing for practice.


Tip: 47
Icing: medium consistency
Positions:
- Bag: 45° angle at 6:00 for vertical strips, at 3:00(9:00) for horizontal bars
- Tip: lightly touching surface, serrated side up

Sequence:
1. Squeeze evenly, vertically.
2. Stop squeezing.
3. Lift tip away.
4. Squeeze evenly, horizontally across vertical strip.
5. Stop squeezing.
6. Lift tip away.

With bag in 6:00 position, squeeze out a vertical strip of icing. With bag in 3:00 (9:00) position, squeeze out short horizontal bars across the vertical bar. Spacing between the horizontal bars should be the same as the width of the tip. To expand the basketweave pattern, simply repeat the two previous steps, one vertical bar at a time. Note that each new set of horizontal bars fits between the horizontal bars of the previous set.

When you make the basketweave pattern, be sure that your horizontal bars are long enough so that the next vertical strip can cover their ends without breaking the evenness of the pattern.

That's how you get a deep, three-dimensional look. After you have practiced your basketweave on a flat surface, try it on your upright board so you get the feel of doing it on the side of a cake. When covering the side of a real cake with the basketweave patten, start at the base of the cake and work your way up.

Saturday 14 June 2008

Wilton Cake Decoration Lesson 1


Hari pertama aku menghadiri kelas Cake Decoration kat Reading. Kelas akan diadakan sebanyak 4 kali iaitu setiap hari Sabtu mulai 14 Jun 2008. Kelas hari ini lebih kepada penerangan ringkas mengenai keseluruhan kursus dan cara-cara membuat buttercream icing serta cara menlapis dan mengicing kek untuk persediaan projek minggu hadapan iaitu Rainbow Cake.

Projek Deco Bunga Ros


Sediakan flower nail atau cone holder yang terbuat dari bahan besi dan beri sedikit BC diatas ujungnya yg runcing dan pasangkan wafer cone. Perlu diletakan sedikit BC supaya wafer cone nya tidak goyang/ bergerak2 ketika cone holder dipusingkan. sesuaikan warna wafer cone dengan warna roses yang hendak dibuat.


Dengan menggunakan nozzle khusus untuk membuat rose flower mulailah membuat putik bagian dalam satu persatu.


Setelah bahagian putik siap. Mulaikan membentuk kelopak. Jangan lupa cone holder perlu selalu diputar dengan perlahan-lahan sehingga tiap kelopak saling berkaitan satu dengan yg lain


Susun tiap kelopak rose flower dengan cara menyelipkan satu persatu kelopaknya dengan kelopak yg lain. Sehingga membentuk bunga yang cantik.


Jika ingin membuat half roses,cukup beberapa buah kelopak saja menutupi putik. Bila ingin roses flower yang lebih mekar dapat ditambahkan kelopak demi kelopak lagi.


Beginilah penampakkan setangkai rose flower yang sudah selesai dibuat.
Letak satu persatu roses flower ini menurut kreativiti anda diatas cake.


Buatlah tangkai dan daun, variasikan warna hijau utk daun dan coklat untuk tangkai diengkapi dengan hiasan lain contohnya coklat berbentuk love dan butterfly,semburkan warna yang ceria.Cake dengan hiasan roses flower siap.